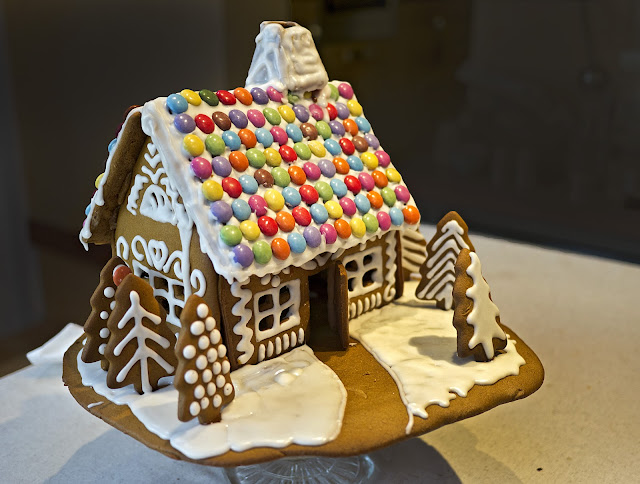
Nina
and Olav's Gingerbread House
This is anything BUT slimming, but still worth including for this time of year.
Once
made, the dough can be baked straight away, or kept for a few days in
a sealed plastic bag in the fridge. It is best to make the house over
two days: the first day you bake and decorate the pieces, the second
day assemble them. If you try and decorate them after the house has
been assembled, the icing runs – great for icicles, not so good for
patterns.
According
to the recipe, you can use brown or white sugar – I used unrefined
caster sugar. I also found that I needed almost three times as much
icing as they suggested. The dough makes more than enough for the
house and the base, with plenty extra for trees, men, stars and other
biscuits to nibble on while you wait for Demolition Day!
For
the dough:
225g
sugar
375g
syrup
1½
tsp ground ginger
4½
tsp ground cinnamon
1
tsp ground cloves
1
tsp ground cardamom
225g
butter
2
eggs
3
tsp bicarbonate of soda
750-850g
plain white flour
For
the icing:
400ml
icing sugar
1
egg white
a
few drops lemon juice
For
the 'glue':
250ml
sugar
Place
sugar, syrup and spices in a saucepan and bring to the boil (It is
best to use a large saucepan for this, as the mixture starts to foam
and expand as soon as you add the bicarbonate of soda. ). Add the
bicarbonate of soda and stir until it is becomes frothy. Place the
butter in a bowl and add the hot sugar mixture, stirring until the
butter has melted. Add the eggs and leave to cool. When the mixture
has cooled, gradually add the flour, stirring well between each time
(I used a food mixer for this).
I
found the dough was easier to use after 10-15 minutes, rather than
immediately after it was made.
Roll
out the dough directly on the baking plate (I used greaseproof paper
on top of the tray) to a thickness of around 3mm, and cut out the
pieces using the templates (including the holes for the window and
doors – the door gets bakes separately). Make two of each piece,
plus a base large enough to take the finished house.
Bake
the pieces, leaving enough space between each piece for them to
expand slightly, at 180°C for ten minutes. Leave to cool before
decorating.
When
the biscuits have cooled completely, decorate with the icing. Mix
together all the ingredients and stir well, then pipe out the pattern
– the only limitation here is your imagination! Add Smarties or any
other colourful candy while the icing is still soft, pressing them
firmly into the icing. Leave the icing overnight to set completely.
The
following day, melt the sugar on a wide pan and dip the pieces in the
sugar on the edges they will be joined with another piece. It is best
to have two people do this – one to dip and the other person to
hold the pieces in place as you join them. Just be very careful you
drip hot sugar on your assistant – as it WILL burn and blister the
skin (as my husband found out)!
Once
the house is all assembled you can touch up with any icing to create
snow, icicles and cover up any cracks etc.
The house is assembled, but I think it needs a little snow on the ground.
The
house will keep well for at least a couple of weeks and still be OK
to eat.
Enjoy!


